An Error Occurred Downdoading Require Compontment Please Check Internet and Run Setup Again
In this guide, y'all will learn how to gracefully handle network connection state changes in a React Native app by utilizing NetInfo for data well-nigh network connection and axios to make network requests to a public API.
For those of us who are involved in mobile app edifice, it has speedily become a priority to consider users who may not have access to the internet or accept a poor network connection … but still want to admission your application. Making your app resilient in the face up of unknown connectivity tin can greatly improve user experience and consequently, user retention.
Getting started
Earlier we can swoop into our demo, we must get-go create a React Native project by running the following command:
npx react-native init MyOfflineApp
In my case, the proper name of the project is "MyOfflineApp," merely you can alter it per your preference.
Next, become into the Project binder and install the required npm packages:
cd MyOfflineApp npm i --save @react-native-community/netinfo axios react-native-modal
Then, run the following command for iOS for linking libraries using CocoaPods:
npx pod-install
In the following sections, we'll discuss how to prepare your app and your users for changes in network connectivity.
Communicate status modify to the user
Most mobile apps require users to have an internet connection to fetch information from an API. However, as a developer, you cannot wait the user to have a stable internet connection all the time. That means that if you want your user to be able to use your mobile app at all times, regardless of connectivity, you need a plan to handle cases where your user's internet connection goes down while the app is retrieving data from the server.
The commencement step of this plan should exist letting the user know that their device is non connected to the net; it is also wise to set upwardly a fallback UI until the connection is upwards again.
TheNetInfo parcel
The NetInfo bundle provides information virtually the user'southward active network connexion and connectivity status of their mobile device. It as well identifies the user's current network type (WiFi, cellular, ethernet, so on). If the connection is cellular, then netinfo will likewise render the generation type (2G, 3G, 4G), every bit well every bit how expensive the connectedness is in terms of battery consumption and monetary value.
How to use NetInfo
You lot can import the NetInfo package into your component file equally shown beneath:
import NetInfo from "@react-native-customs/netinfo";
You can subscribe to network land changes using the addEventListener() method:
NetInfo.addEventListener(networkState => { console.log("Connection blazon - ", networkState.blazon); panel.log("Is connected? - ", networkState.isConnected); }); The addEventListener() method will return the reference to the unsubscribe method, which you can use to remove the listener when the component unmounts.
If you lot require the active network land only once, you tin can use the fetch() method instead of listening to changes:
NetInfo.fetch().and so(networkState => { console.log("Connection blazon - ", networkState.type); console.log("Is connected? - ", networkState.isConnected); }); The network land object has the following shape:
{ type: "wifi", isConnected: true, isInternetReachable: truthful, isWifiEnabled: true, details: {...} } The type key (network type) can exist one of the following values.
-
none -
unknown -
cellular -
wifi -
bluetooth -
ethernet -
vpn -
wimax -
other
Annotation that the details property is different for each value of the type belongings. You tin can find more than details on the NetInfo API in the documentation.
Demo setup: Using NetInfo and axios to manage connectivity
For this example, nosotros will create an example app with a list of users that will be fetched from the random user API.
Get-go, import the required packages at the pinnacle of your component file:
import React, {useEffect, useState} from 'react'; import axios from 'axios'; import { View, StyleSheet, FlatList, Image, Text, Dimensions, SafeAreaView, } from 'react-native'; Next, create a User component that will brandish the information for an private user in the listing. This shouldn't be terribly complex; add an Image component to display the user's avatar and a couple of Text components to brandish the user's name and email:
const User = ({name, e-mail, avatar}) => ( <View way={styles.user}> <Image source={{uri: avatar}} style={styles.avatar} /> <View style={styles.info}> <Text style={styles.proper noun}>{proper noun}</Text> <Text way={styles.electronic mail}>{email}</Text> </View> </View> ); Inside the Users component, fetch the data from the API and render the list of users using the FlatList component. To make the network asking, utilize the axios.go() method and pass the API endpoint.
For reference, axios is used to brand network requests to a public API. The react-native-modal bundle will exist used to display the connection error notice at the lesser of the screen.
Finally, fetch the users inside the useEffect hook callback and store the results in the users state variable. You will also store the loading state in a isLoading variable to bespeak that the information is being fetched.
const Users = () => { const [isLoading, setLoading] = useState(false); const [users, setUsers] = useState([]); useEffect(() => { fetchUsers(); }, []); const fetchUsers = () => { setLoading(true); axios .become('https://randomuser.me/api/?results=30') .so(({data}) => { const {results} = data; setUsers(results); }) .finally(() => { setLoading(false); }); }; return ( <SafeAreaView way={styles.container}> <FlatList onRefresh={fetchUsers} refreshing={isLoading} data={users} renderItem={({item: user}) => ( <User name={`${user.proper name.first} ${user.proper name.final}`} email={user.email} avatar={user.picture show.thumbnail} /> )} keyExtractor={(user) => user.login.uuid} /> </SafeAreaView> ); }; consign default Users; Y'all tin find the styles object for the components below:
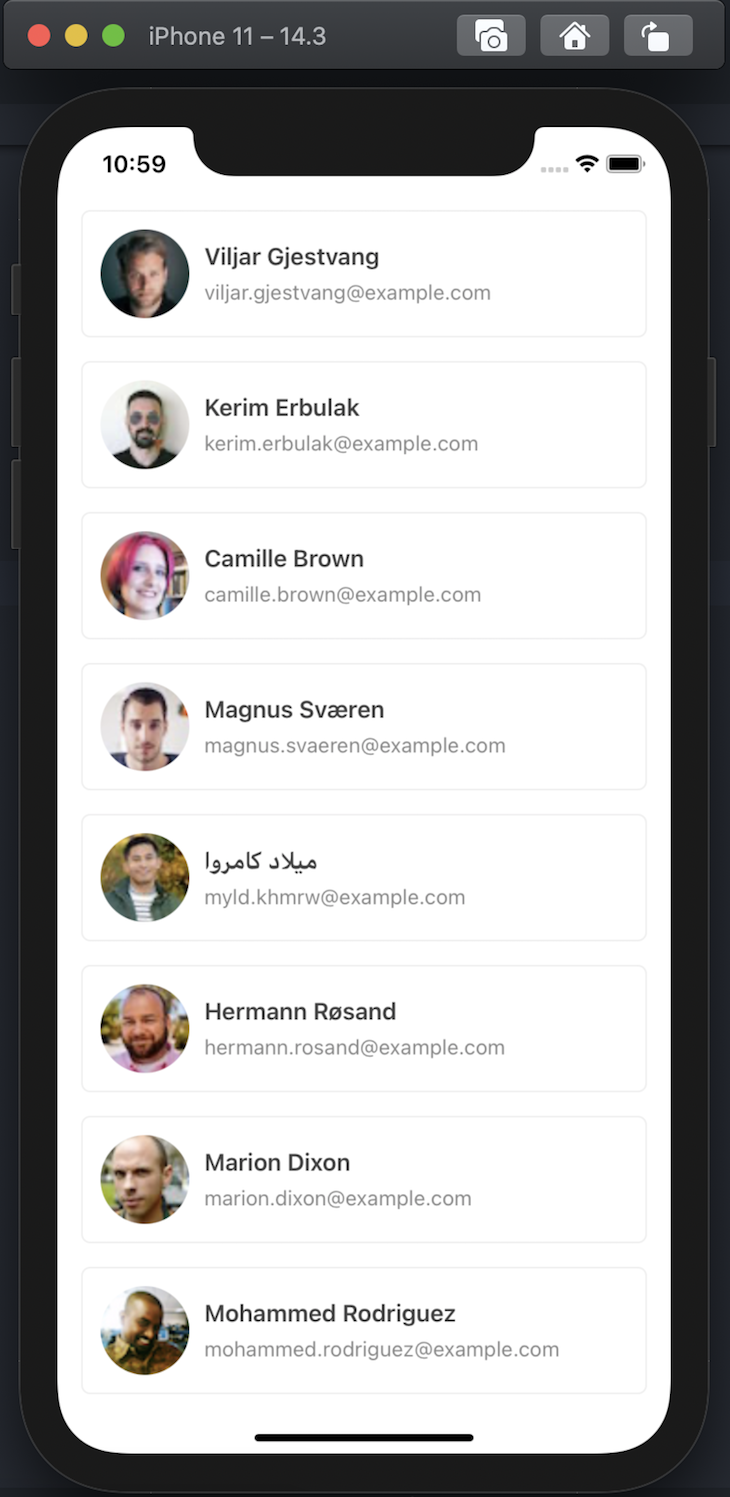
const styles = StyleSheet.create({ container: { ...StyleSheet.absoluteFillObject, }, user: { width: Dimensions.get('screen').width - 32, alignSelf: 'eye', marginVertical: 8, padding: 12, borderWidth: 1, borderColor: '#eee', borderRadius: 6, flexDirection: 'row', alignItems: 'heart', }, info: { marginLeft: 10, }, avatar: { width: 60, top: lx, borderRadius: 100, }, proper noun: { colour: '#424242', fontSize: sixteen, fontWeight: '600', }, email: { marginTop: 6, color: '#888', }, }); At this point, you should exist able to fetch the user information from the API and display it on the screen, as shown in the graphic below.
Alert users with NetInfo.addEventListener
Next upward, we will review how to handle the UI when the user's net connection is disrupted.
Start, create a isOffline state variable that will hold a boolean value to represent if the user is offline or not. Add NetInfo.addEventListener in the useEffect claw to listen to network changes and update the value of isOffline state.
Come across below:
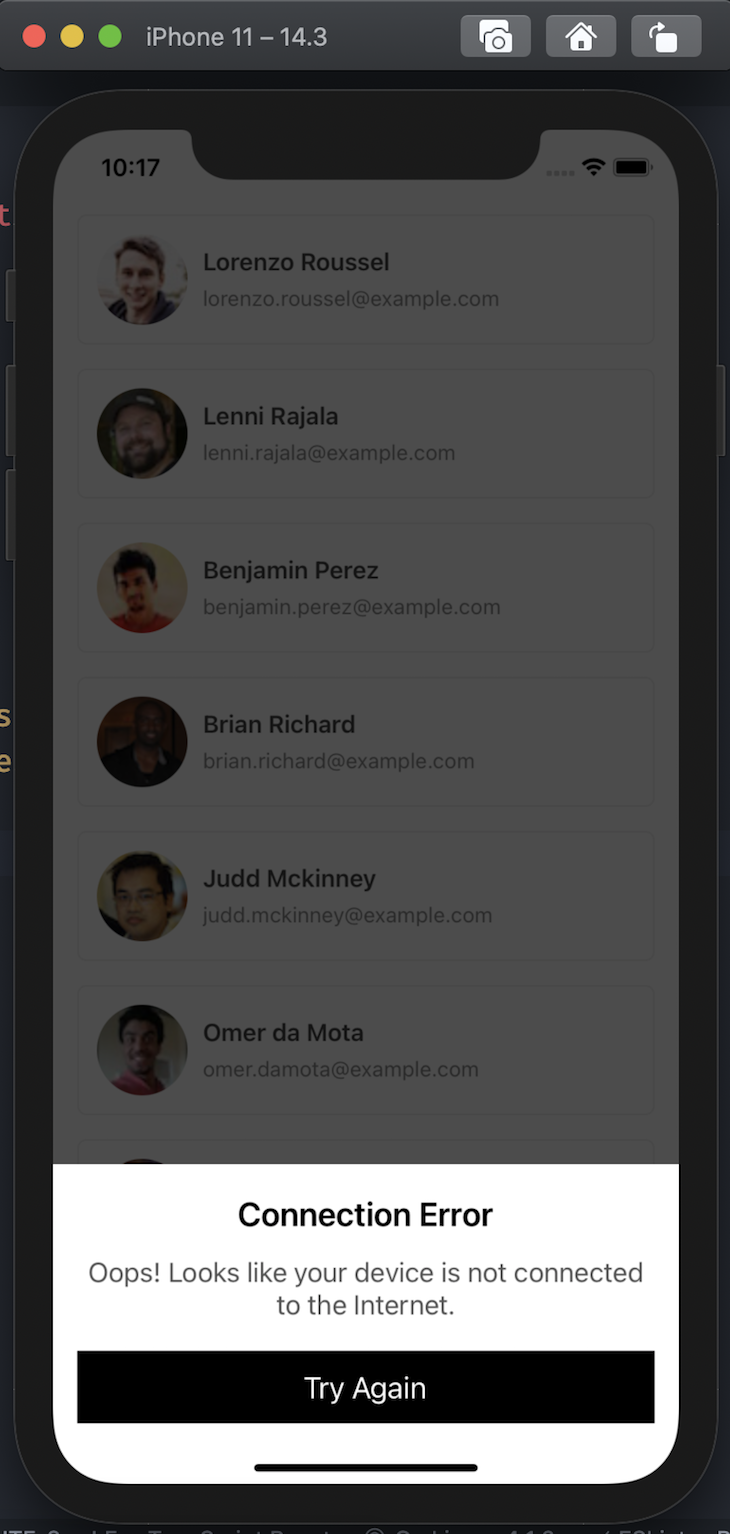
const Users = () => { // ... const [isOffline, setOfflineStatus] = useState(false); useEffect(() => { const removeNetInfoSubscription = NetInfo.addEventListener((state) => { const offline = !(state.isConnected && country.isInternetReachable); setOfflineStatus(offline); }); fetchUsers(); return () => removeNetInfoSubscription(); }, []); // ... } With this setup, whenever the isOffline state is false, a small modal will open up upwards with the error message and a retry button.
When the retry push is pressed, call the fetchUsers() role, and fix the isOffline state to false if the request was successful.
const Button = ({children, ...props}) => ( <TouchableOpacity way={styles.push} {...props}> <Text style={styles.buttonText}>{children}</Text> </TouchableOpacity> ); const NoInternetModal = ({bear witness, onRetry, isRetrying}) => ( <Modal isVisible={show} way={styles.modal} animationInTiming={600}> <View fashion={styles.modalContainer}> <Text fashion={styles.modalTitle}>Connection Error</Text> <Text style={styles.modalText}> Oops! Looks similar your device is not continued to the Internet. </Text> <Button onPress={onRetry} disabled={isRetrying}> Try Again </Button> </View> </Modal> ); const fetchUsers = useCallback(() => { setLoading(true); axios .go('https://randomuser.me/api/?results=30') .then(({data}) => { const {results} = data; setUsers(results); isOffline && setOfflineStatus(simulated); }) .finally(() => { setLoading(false); }); }, [isOffline]); // inside <Users /> component <NoInternetModal testify={isOffline} onRetry={fetchUsers} isRetrying={isLoading} /> To test it out, disable your WiFi network and bank check out the app screen. (If you are having difficulties in getting the expected upshot on the simulator, endeavour using a real device).
For the same look for the modal as above, you lot can include the style object below with the styles for the users components.
const styles = StyleSheet.create({ // ... modal: { justifyContent: 'flex-end', margin: 0, }, modalContainer: { backgroundColor: '#fff', paddingHorizontal: 16, paddingTop: 20, paddingBottom: 40, alignItems: 'centre', }, modalTitle: { fontSize: 22, fontWeight: '600', }, modalText: { fontSize: 18, colour: '#555', marginTop: xiv, textAlign: 'heart', marginBottom: 10, }, button: { backgroundColor: '#000', paddingVertical: 12, paddingHorizontal: 16, width: '100%', alignItems: 'centre', marginTop: ten, }, buttonText: { colour: '#fff', fontSize: 20, }, }); Decision
In this guide, nosotros reviewed the NetInfo library and a simple utilise example for treatment network connection state. For farther exercise, yous could look into ways of making the network connexion state available to all components (global) using Context API or a tertiary-political party library like Redux.
In a more advanced use case, you tin let the users browse the app without the internet by caching the data from the server. This is a strategy commonly used by social media apps to increase engagement and discourage users from exiting the app.
I hope you were able to acquire something new with this guide. Cheers!
LogRocket: Instantly recreate issues in your React Native apps.

LogRocket is a React Native monitoring solution that helps you reproduce issues instantly, prioritize bugs, and sympathise performance in your React Native apps.
LogRocket also helps you increase conversion rates and product usage by showing you exactly how users are interacting with your app. LogRocket'due south production analytics features surface the reasons why users don't complete a item menstruation or don't adopt a new characteristic.
Start proactively monitoring your React Native apps — try LogRocket for complimentary.
Source: https://blog.logrocket.com/managing-network-connection-status-in-react-native/
0 Response to "An Error Occurred Downdoading Require Compontment Please Check Internet and Run Setup Again"
Post a Comment